
Try to personalize everything!
Down to the simplest little things that you use..
everything needs your own flare!
Often when making blankets and stuffed objects I use a chopstick to turn the corners or add stuffing etc... a simple stick...how boring.....

He was very simple to make and here is a quick tutorial on how to make on of your own...or just how to make a Panda to add to other things around the house :D if you don't want to make one but would like one of your own I have him listed here Panda on ETSY
No Pandas were harmed in the making of this project!
Need:
One package of black and white Polymer clay.
A chopstick often found in your local grocery store.
a knife
a needle
and clean hands!
1.Take a small piece of white clay about the size in the picture
2. Roll into a ball making one end slightly more pointed for the nose.
3. Next take two very small round black balls
4. Roll one into a tube for the ears

5 & 6.. Slightly Squish the two ends together to make
ears do same to other ear.
7. Squish both ears on the pandas head like so.
8. Take another small ball of black clay and flatten
it out and add to the end of the nose area.

9. Take the back end of a paint brush and make
indents for the eyes.
10. roll out two small black balls
11. Squish the little black ball very flat with your digits.
12. Press the flatten end balls into the indented
eye sockets :D


13. Make a black ball shape about the same size as the head.
14. Roll out the ball into a long tube for the arms.
15. using your digits make little paws by pinching the end of the tubes
16. Score the under side of your panda head and the pandas arms.
If you have any liquid sculpey apply a dot on the under side
of the head as if it were glue. If you do not have any liquid
sculpey just score really good and press the head onto the arms.

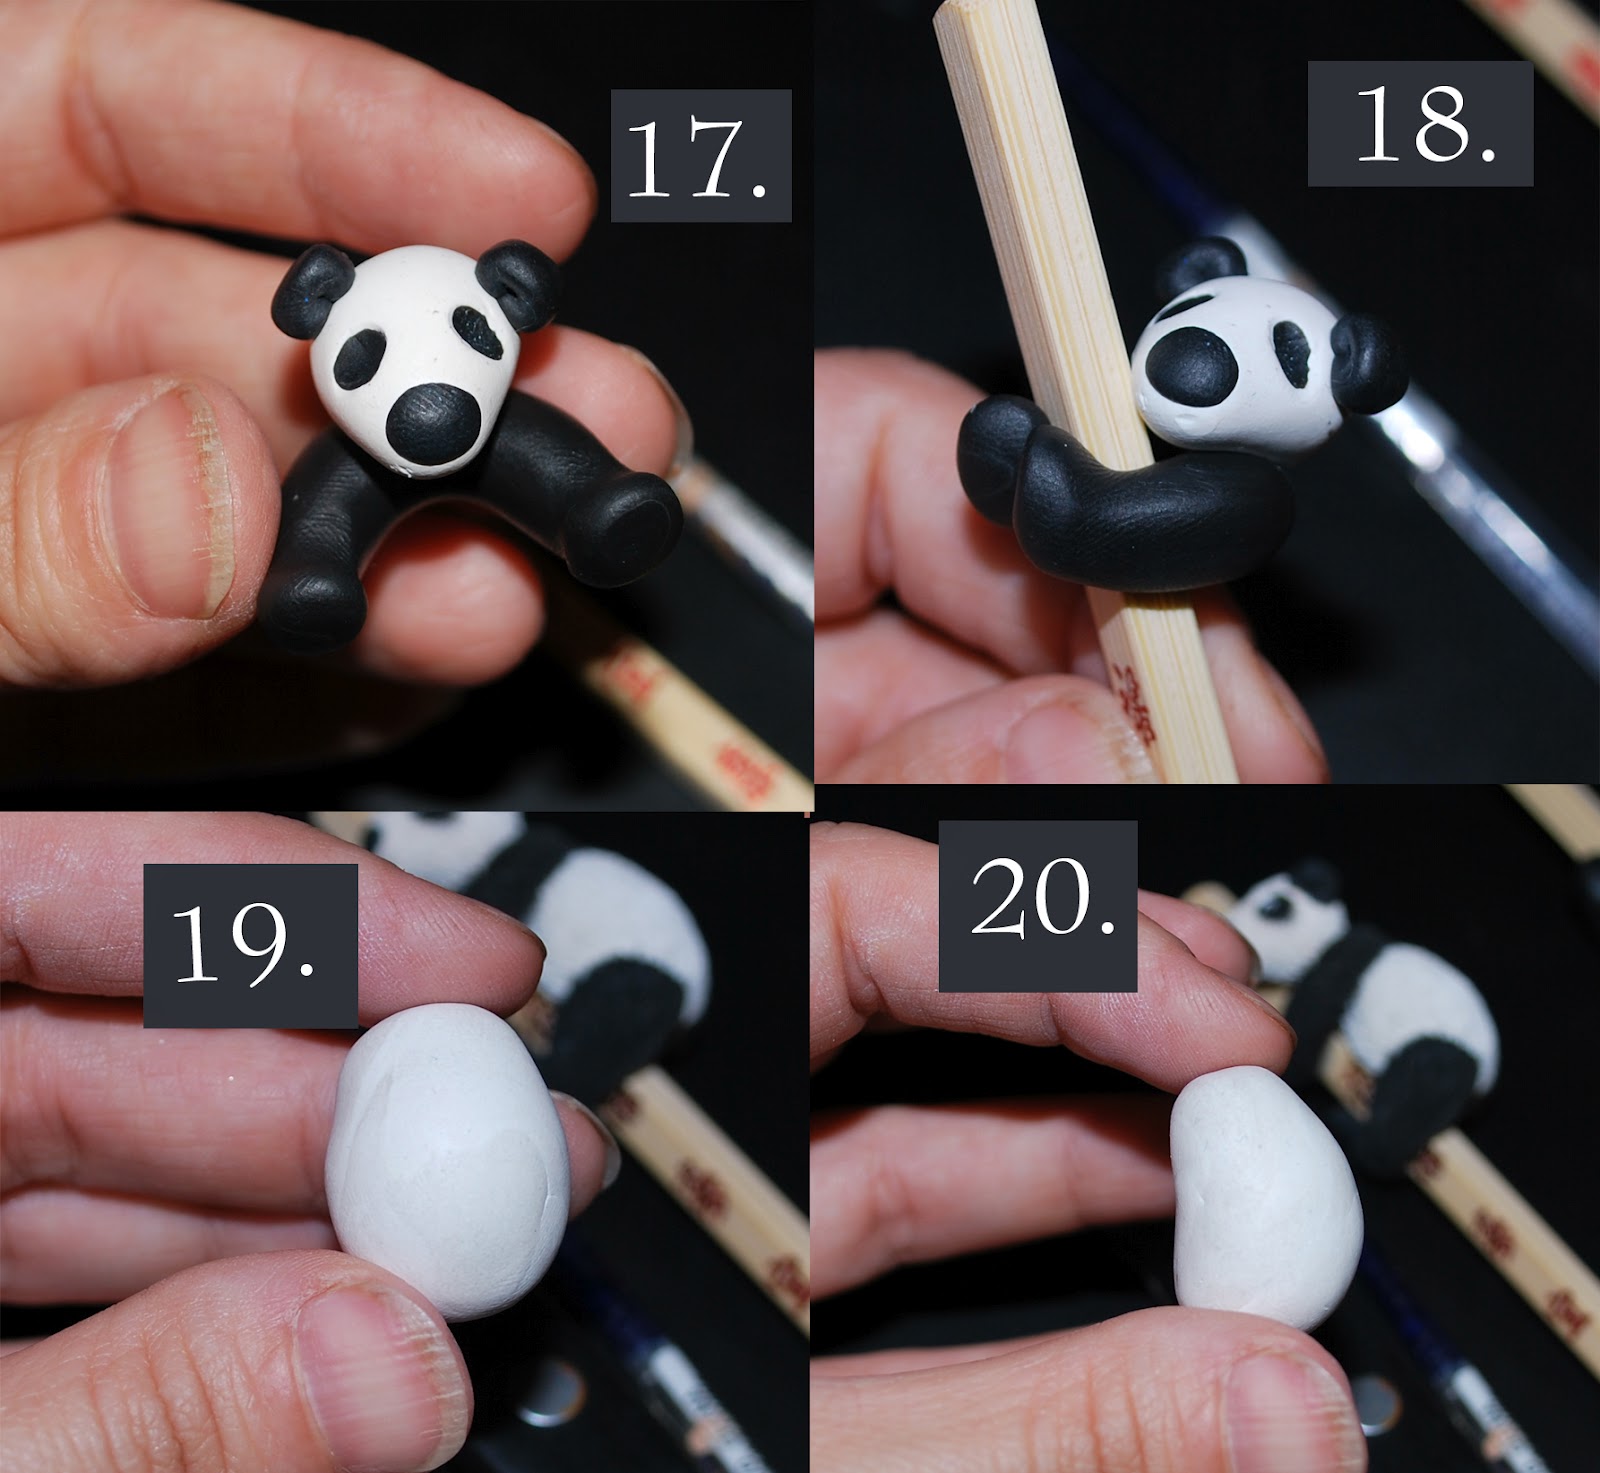
17. How it looks at this point kinda cute already huh!!
18. take your chop stick or stuffing stick and wrap the
pandas legs around it and press slightly so he stayed put
19. roll and a large white ball for the body
20. roll the ball into you get a shape like so score the
top part of the body and the under side of the arms and
stick the body to the arms
21.Roll out two balls for the legs
22.Roll on of the balls between your fingers until you
get a leg shape and do the same with the other ball.....at
this point I realize i forgot to take a picture of how to make
the mouth. Basically I took the knife I have been using for
scoring and I poked it in to the mouth spot and pulled down
to make a open mouth shape.
23. score the under side of the legs with your knife and apply
the legs to the body. Use liquid sculpey if you have some
24. so right now you have a cute non fuzzy panda... however
this guy needs some fuzz! take your pin or needle and start
scoring all over start at the back of the neck and score the
colors together...go all the way down the back.

25. scoring down the arm
26. I worked on the face last make sure to score the black
spots in the eyes..
spots in the eyes..
27. bake your panda at 275 for 20 minutes ...its ok to bake
the stick...after he is cool I painted the eyes and
the stick...after he is cool I painted the eyes and
28. DONE!


Love your panda. I had never worked with Clay but i do have to do it one of this days!! Congrats!! Its a lovely project an very well explained
ReplyDeleteThankyou! If you do ever try your hands at clay please send me a pic I'd love to see what you come up with :)
DeleteThis is fantastic! You are so talented. Thanks for linking up. I hope to see you next week, too. :)
ReplyDeleteThank-YOU!!!!!! I most def plan to link up more!!! Grinning from ear to ear :D
DeleteDo you get the same effect of scoring with a needle? If not what do you use the needle for?
ReplyDeletecan't wait to start on the panda!!
Thanks!